Introduction:
In Revit, there are two ways to evaluate the daylighting performance in buildings: Illuminance renderings and Insight Daylighting analysis. Illuminance renderings can provide a quick way to visually understand the illumination levels in a space through daylighting as well as artificial light sources. The visualizations display a color scale on the surfaces in the rendering to help you determine whether the lighting design meets the requirements of the space.
This video shows the workflow for evaluating the building’s lighting levels by using illuminance renderings.
Workflow Steps:
Open the Project
- Download and open a building element model in Revit.
For an Illuminance Rendering in Revit, you need to use a building element Revit model or the analysis will not work.
Set Project Location
- Set the Location and Weather Station for the project
- Go the Analysis tab and open the Location tool.
- Choose to Define Location by Internet Mapping Service.
- Enter an address, then click Search.
- Select the Location and click OK.
Create Illuminance Renderings
- From the View tab, select Render in Cloud.
- If prompted, select Continue in the dialog box that welcomes you to Rendering in the Cloud and summarizes the steps need for Illuminance rendering.
- On the next screen, select a 3D view created in the project for the illuminance rendering.
You can select one or multiple views to render at the same time.
- For Output Type, select Illuminance.
- Select the Image Size to set the resolution of the rendering.
Set the Illuminance and Rendering Settings
- In the Location/Time settings tab, select the date and time to be used in the rendering.
The analysis will use your model’s location, so you will not need to set the location here.
- In the Sky Model settings tab, select one of the six different sky models for the illumination rendering and set the sun’s intensity (irradiance) if needed.
- In the Legend settings tab, set the Units, the scale range, and the scale increment.
- For the units, select Footcandles or Lux.
- For the scale range, specify the minimum and maximum values to be display in the rendering. Select Automatic to set the scale’s range to the minimum value and maximum value calculated in the simulation with 10 proportional subdivisions.
- For the Scale Increment, select Logarithmic to visually distinguish between values in the lower portion of the range while still capturing very high values.
Start the Rendering Process
- Select Start Rendering.
Revit will notify you when your images are ready with a pop-up window in the lower corner of the Revit screen, and by email if you selected that option.
View Renderings
- Click the View tab and select Render Gallery to view and download you completed renderings online.
To access the renderings, you will need to login to Autodesk 360.
Exercise:
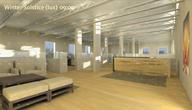
This exercise will focus on analyzing varying daylighting strategies for a classroom space in the Audubon Center. The exercise uses Lighting Analysis for Revit, a cloud based rendering service.
In this exercise, you will learn how design decisions about aperture placement, light shelves, and façade construction impact daylighting strategies. Furthermore, this exercise demonstrates how you can run daylighting simulations that allow for the quantitative measurement of daylighting, as associated with varying design iterations, in both plan a perspectives views.
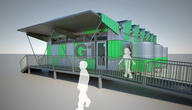
In this exercise, you will focus on one of the classrooms in the Audubon Center. Be sure to check out the “01_Floor Plan” 3D view in the dataset to understand where the room in positioned in the building.
Download Data Sets: Revit 2017-Audubon Classroom Daylighting.rvt
Follow the steps outlined below:
- Open the Daylighting model in Revit
- Familiarize yourself with the 3D views,
- Open each 3D perspective view and observe how they differ.
- Perspective-Baseline has no additional apertures or devises added
- Perspective-Light Shelf has an added light shelf based on rule of thumb sizing.
- Perspective-Skylight has an added skylight
- Open each 3D perspective view and observe how they differ.
- Run Daylighting Analysis
- Within the View tab, select Render in the Cloud
- Use the following settings
- Render All 3D Views (this will render all 7 3D views)
- Output Type = Illuminance
- Image Size = Large
- Set Date to 2016-09-21
- Set Time to 13:00
- From Sky Model roll down select CIE Overcast Sky
- DNI = 746; DHI = 90
- From Legend Values set the units to whatever you are comfortable with
- Select both Automatic and Logarithmic for the Legend
- Click Start Rendering
- Submit the same set of 3D views for rendering again using a different legend scale
- Repeat the settings above in i-viii. For the Legend, select 0 – 200 Footcandles, or 0-2000 Lux.
- Click Start Rendering
- Review Results
- Click on Render Gallery from the View tab to see your results
Additional Resources:
- Placing Cameras for 3D views: You can create an illuminance rendering for any 3D view in Revit. For best practices of how to create this view, check out this page.
- Setting the Sky Model: This page covers some of the settings you can use when creating an illuminance rendering. Specifically, setting your sky model is very important. This page provides you with some guidance on how to pick the best model.
- Setting Glazing Properties: Since the daylighting analysis in Revit considers the material properties of your model in order to accurately simulate the behavior of the light, it’s important to set your material properties appropriately. This page describes how to set the glazing properties for analysis.
- Setting Reflectivity: The same is true with the reflectivity of materials in your model. This page will provide all the details.
- Re-rendering from the Gallery: You can create renderings from your Revit environment, but you can also re-render existing 3D views form the Gallery. This is a great option when you have your 3D view set, and just want to iterate through some different scenarios. Find more details here.
- Getting DNI and DHI: One of the settings for illuminance renderings is to enter the DNI and DHI for the site, day, and time of your rendering. Visit this page to know how you would gather that information on your own.