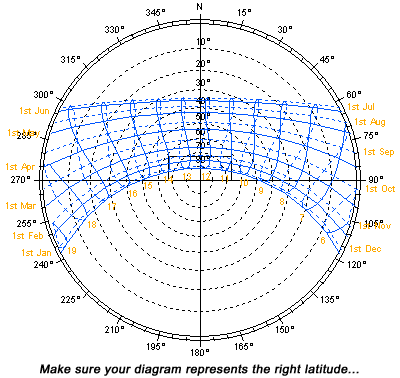
Sun path diagrams can tell you a lot about how the sun will impact your site and building throughout the year. Stereographic sun path diagrams can be used to read the solar azimuth and altitude for a given location.
 |
|
How to read Sunpath Diagrams At 9am... on April 1... the azimuth is 62o the altitude is 30o |
Stereographic Sun Path Diagrams
Note that these stereographic diagrams are not exactly like a fish-eye photo: such an image would be flipped left-to-right. These diagrams are from the point of view of the sky looking down at the ground, you can superimpose it on a map or a plan of the building without being confused. (You can see this by following the hour lines from east to west on the diagram.)
- Azimuth Lines - Azimuth angles run around the edge of the diagram.
- Altitude Lines - Altitude angles are represented as concentric circular dotted lines that run from the center of the diagram out.
- Date Lines - Date lines start on the eastern side of the graph and run to the western side and represent the path of the sun on one particular day of the year.
- Hour Lines/ Analemma - Hour lines are shown as figure-eight-type lines that intersect the date lines and represent the position of the sun at a specific hour of the day. The intersection points between date and hour lines give the position of the sun.
Reading the Sun Position (Step-by-Step)
|
|
How to read Sunpath Diagrams At 9am... on April 1... the azimuth is 62o the altitude is 30o |
 |
| Annotated stereographic sun path diagram. |
- Locate the required hour line on the diagram.
- Locate the required date line, remembering that solid are used for Jan-June and dotted lines for July-Dec.
- Find the intersection point of the hour and date lines. Remember to intersect solid with solid and dotted with dotted lines.
- Draw a line from the very center of the diagram, through the intersection point, out to the perimeter of the diagram.
- Read the azimuth as an angle taken clockwise from north. In this case, the value is about 62°.
- Trace a concentric circle around from the intersection point to the vertical north axis, on which is displayed the altitude angles.
- Interpolate between the concentric circle lines to find the altitude. In this case the intersection point sits exactly on the 30° line.
- This gives the position of the sun, fully defined as an azimuth and altitude.
 |
|
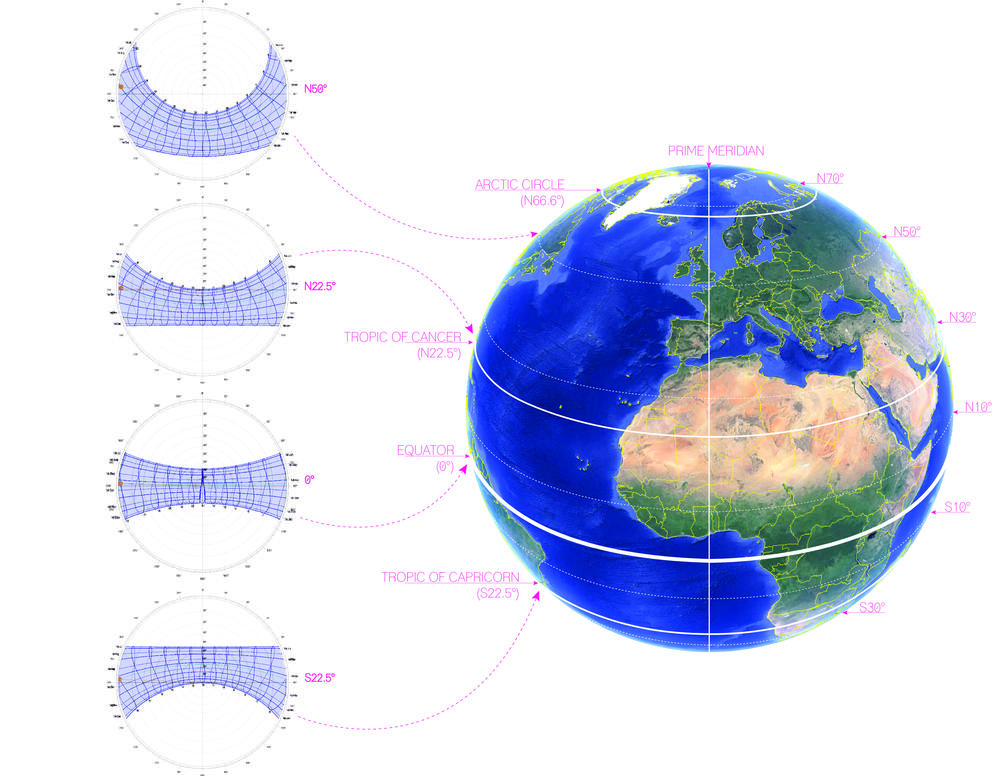
Sun charts illustrating the variation in the sun’s movement in relation to latitude. |